
How to Set-Up A File for Print
When creating graphics for print, there are many programs you can use. Photoshop, Illustrator, and InDesign hold the monopoly on graphic design, and to be honest they’ve got the procedure down to a fine art.
That said, we have clients that send us files made in Corel, which is totally fine.
The programs you want to steer away from when designing for print are Word and PowerPoint.
These two are monsters when it comes to making things with suitable resolution or large physical size. Word is a great word processor, but please please please do not use it to make a banner with pictures. (Or a texture. Or a background that is anything but a solid colour.)
PowerPoint is great for slide shows. That’s what it’s for, and it’s really good at it. But making a banner or a backdrop at a specific size on either of these is frustrating, and will usually result in a bad product.
In additional to the Adobe suite, there are a whole shlew of other programs that will work fine. As long as you can easily set your size and resolution, as well as export the file as a pdf, you should be alright.
File Types
This brings me to my next point. What types of files should you use when sending them to a printer? Print ready pdfs are great. Generally, you can’t go wrong with a pdf.
A psd (Photoshop file) is usually fine, though if you include your layers the files tend to be large. An ai file type (Illustrator) is usually okay also, though there could be concerns if it is created on a more recent version. A lot of printers tend to cling to what programs they already have, so if they’re using CS4 or something older it could cause some issues.
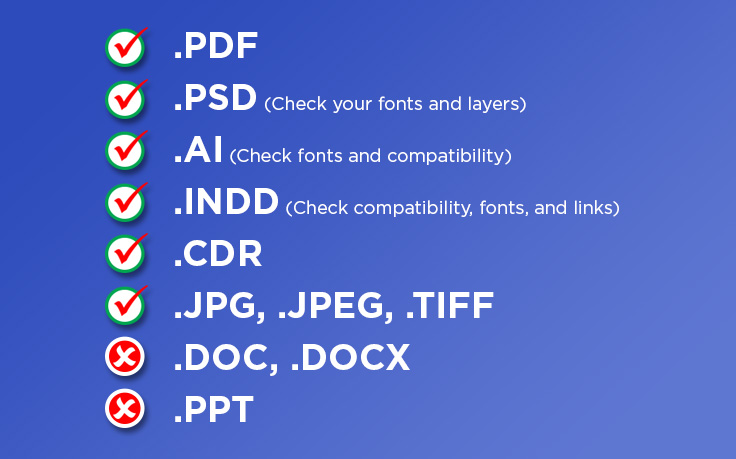
InDesign has a great backwards compatibility feature in its IDML option. (To do this, export your file and change ‘Save Type As’ to InDesign Markup (IDML). This will ensure that a printer with an older version of a program can still open and export your file to their specs. If you do send an InDesign file (either an indd or an IDML) make sure any linked images are included.
I mentioned CorelDraw before, and the cdr file type is usually acceptable as well. Like Illustrator, these are vector based files.
A jpg, jpeg, or tiff file can be just fine, as long as (again) they’re the proper final size. (Seeing a trend yet?) There is nothing worse than a flattened jpg scaled down to 25% of the required print size and saved at 72 ppi. This is beyond frustrating, and WILL result in a low quality output. These file types need to be sent at the highest quality possible to make sure your image is crisp and clear.
Crop Marks Are Alright, But Not Necessary
If you export a pdf from InDesign (or save as a pdf from Illustrator), you have the option to include crop marks. These are fine, but if don’t worry if you forget. If the file is sized properly (including bleeds - if you need them), then it should fit your printer’s template or set-up just fine.
Now, when you export a file like that, you'll see options for a bunch of other things.
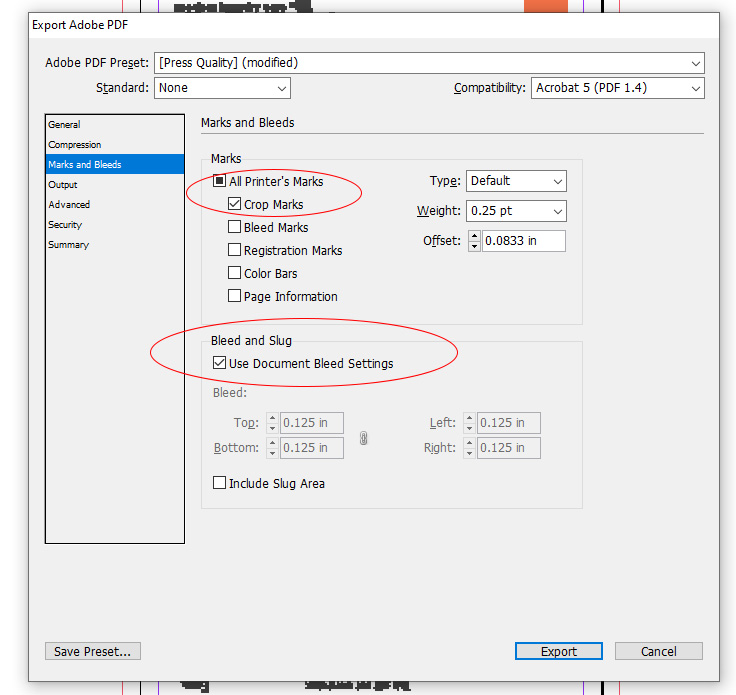
These options include: All Printer’s Marks, Crop Marks, Bleed Marks, Registration Marks, Colour Bars, and Page Information.
Other printers may ask for these, but my personal preference is to ONLY include CROP MARKS. In my opinion, all those other ones are unnecessary.
Again this may change depending on your printer’s specifications. When in doubt, just ask what they need.
Your File Will (Probably) Need Bleeds
Most printers will require ‘bleeds’ on your file. This means that if you have elements, graphics, or colour that touches the edge of your file, you’ll need to push those images/colour/etc over the edge so that when the paper/vinyl/etc is trimmed there is not a white line or edge showing.
If you need something to be 35” by 72”, you might need a bleed of 0.125” (1/8”) around the edges.
This means the file you submit to your printer needs to be 35.25” wide by 72.25” tall.
Both Illustrator and InDesign handle bleeds well (you can set the file dimensions and then add the bleeds on top of that), but you'll have to do the math and increase the dimensions of your project on other programs.
Now, if your borders are plain white (nothing printed to the edges) you won’t need bleeds. Or, your printer may simply scale up your file to meet the necessary requirements, but this means that any important info (text, logo, contact info) will be closer to the edge. Sometimes this is alright, sometimes it isn’t - it depends on your artwork.
For more info on crops and bleeds, click here.
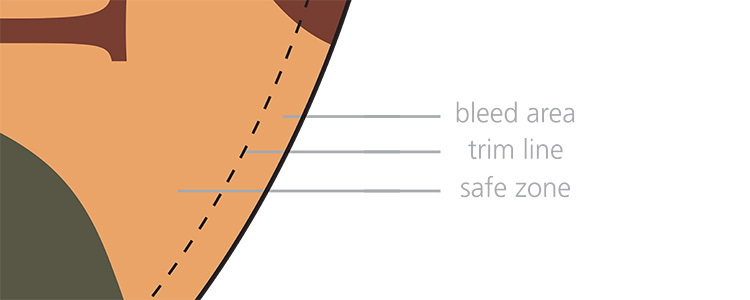
Margins Are Your Friends
For all print, you need a safety zone around the edges. No matter what you’re printing, there can be a shift during printing. Now, I’m talking 1/16 or 1/32 of an inch. (Possibly more on really large pieces.)
Margins are the safe area inside the printing space. Anything outside of these margins could be cut during trimming and lost. To make sure that your important, awesome, eye-catching info is the best it can be, keep it away from the edges and within the margins.
Convert Your Fonts to Outlines
Another thing InDesign does well is packaging fonts along with your files.
This is important, as your printer may not have the same fonts as you. A packaged font just means that if possible the font files will be included in your package so that your printed can install them on their computer to properly export your file.
Even better than that, though, is simply converting your fonts to outlines. This means that your fonts are now shapes instead of editable text. If you need your printer to edit your text for some reason, this might not be the best for you, but if your artwork is finished the best course is to convert your text to outlines. Illustrator and Photoshop (though it is called ‘Rasterize Text’ on PS) do this as well.
Do this. It will save lots of headaches.
For more info on Converting Text to Outlines, click here.
So... Wait, What Do I Need?
Yeah, that was a fair bit of jargon tossed your way all at once.
To sum it all up, make sure your file is made at the correct size to your specs. Make sure it is a good resolution (150 – 300 ppi). And make sure to include those bleeds. Everything else is extra.
Good? Cool. And again, if you have any questions about this stuff, ask your printer, or give us a shout.
Related Products


