
Convention Displays: Pop-Up Displays Made Simple
There are so many different options when trying to choose your convention displays. You may see material names like Tension Fabric, Truss Displays, as well as brand names like Formulate and Vector. There are straight displays, but then there are horizontally and vertically curved ones as well. In addition, you will find 6', 8', 10', and all the way up to awesome and captivating kits designed to fit a 20' exhibition space.
If you're looking at your options, then there is a type I'd like to take a minute to talk about.
KCBGraphics.com is a leading supplier of trade show products in Toronto, Ontario.Please take a look at our pop up display pricing and don't hesitate to give us a call at 1-800-350-7152 or check out our 'shop' at the top of this page.
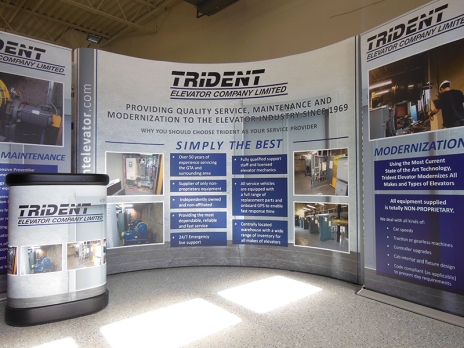
Now, if you clicked on the above link, you see it takes you to a page with 3 different products. It is the curved and straight pop up trade show displays I'd like to talk about here. (The Aero is a bit different, and warrants a whole other post.)
Convention Displays, Step-By-Step Pop Ups
These convention displays are panels (usually 3 or 4 panels plus some curved endcaps if you want) held on an expandable frame. Curved or straight, the frame extends easily, held in place by magnetic clips at structurally important places. To begin with, expand the frame, standing it up in place where you want the display to be.
Secondly, you'll need to attach magnetic channel bars onto the frame. The number of channel bars changes with different sizes of frames, seeing that larger frames have more panels. If you have endcaps to put on, you'll need to make sure you have magnetic bars on the back (just the left and right side) of the frame as well. If not, you'll only need the magnetic bars on the front of the frame.
.jpg)
.jpg)
So, after the magnetic channel bars are in place (easy, right?) you’re ready to put on your first panel. The tops of your panels should have plastic clips that attach to the top of the frame at every section.
.jpg)

Generally, I like to start in the centre. Put the middle panel on first, this helps keep your panels straight if you’re on an uneven floor.
.jpg)
The other panels go on the exact same way, start at the top and guide the magnets on the back of the panels into place.
Magnets on the back of the panels hold them in place.
.jpg)
Keep an eye on the top of the panels, ensuring they are as even as possible.
Finishing the Set-Up
If you find the tops of your panels are uneven, you're probably on an unlevel surface. This can cause a shift, subsequently shifting the panels slightly out of position. If you can move to a different spot, do so. If so, sometimes just moving the frame back a foot or two can help, depending on the surface. Additionally, you can gently nudge the top of the frame left or right (again...gently) to try to correct the discrepancy and get the panels flush at the top. Once the centre panels are set in place, your endcaps can go on, finishing your set-up.
.jpg)
Endcaps do a great job of sealing the sides of your display.
Convention Displays, Extras
To add a little umph to your display, your can add lights or a counter. Lights slide on to clips already attached to the top of your frame, while the shipping case can be wrapped in graphics for a quick and easy counter.
.jpg)
A case wrap makes your case into a simple, branded counter.
There are many other pieces that you could add to enhance these convention displays such as flags and retractable banner stands. These would all simply be based on your own tastes and preferences. For this post, let's stick with the convention display itself. Now, I've only really mentioned the basic 8' display here. The 8' and 10' curved are our most convention displays, though there are quite a few options to choose from. They all go up the same way, whether you have a straight tabletop display, a 6' wide curved display, the Gullwing, or the Serpentine. You can also have panels created to completely wrap around the frame, front and back, using the endcaps to connect both sides.
As always, our staff are always here to answer any questions you may have. Please give us a call or send us an email for more details.
Related Products


