
Perforated Window Graphics for Business
Perforated window graphics are an immensely great way to promote or advertise your business. Big or small, if you've got a window on your storefront and any road or foot traffic at all, you could benefit from impactful and colourful perforated window graphics.
KCBGraphics.com is a leading provider of marketing and products in Toronto, Ontario. Take a look at our quality products and our Window Graphics. Prices are based on the size of your windows. Please don’t hesitate to give us a call at 1-800-350-7152 with any questions.

Perforate Window Graphics for Business
First off, you need to start with a good design. Strong imagery and vibrant colours, combine with clear, easy-to-read text is critical. Keep text brief, you want everything to be able to be read from a distance. The size of the text will vary depending on the size of the window, the distance between the store and the sidewalk or the road.
What Does Perforated Mean?
This means that there are small holes spread across the entire graphic. When properly installed, the media that perforated window graphics are printed on is essentially "invisible" from the inside. You might have seen this media on store windows, and it is very common on vehicle windows. It allows a full colour image to be printed on one side which is visible from the front, but from the back the media appears like a mesh screen, allowing you to see outside.
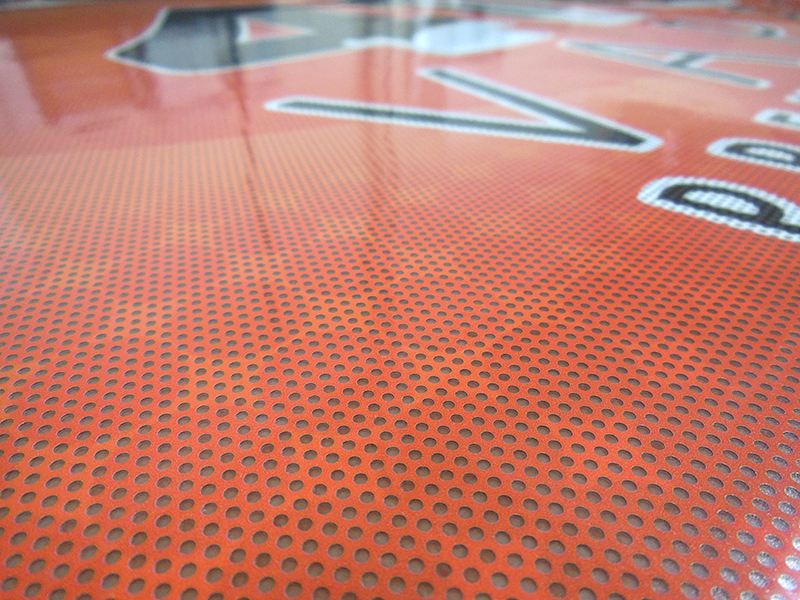
Now, this means that you can't have small text. Anything small, say around 12pt, will have holes through it. But, because it's a window graphic you want people to be able to read from afar, you don't want small text anyway.
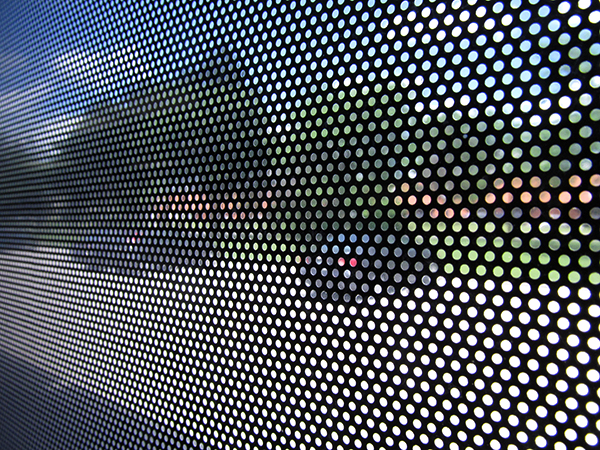
A close up from inside a window covered by perforated media.
So, how does this come together?
Well, we start with your graphics. If you need design, our experts can help. First things first, size is very important. Measure your windows, the final piece will work best it it is 100% adhered to the glass, not running over onto the seal or the window frame. If you've already got your artwork ready, send it along and we'll start from there.

For the best results, use a good degreaser, sharp knives, and lint free
towels. (The long handle blade is used to remove old graphics.)
When the piece is printed, it comes on a backer so that the ink doesn't spray through and cover the printer. Next, after the ink has time to completely dry (at least 24 hours), the media is laminated with an optically clear laminate. Without a laminate dirt and grit would fill every one of those little holes, as well as sun and rain fading at and destroying the image.
After laminating, the graphics are trimmed to size. After this, the next step is the application on the windows.
So a small piece, it is completely possible for a novice to install. There are many videos on youtube to help with this, here's one from MACtac to get you started. This video shows both a wet and dry application. Please note that if you are applying a perforated material, you need to do the dry application. If you install using the wet method, liquid will absolutely become trapped in the holes and interfere with both the adhesive's bond and the visual impact. Only use the wet method when the graphic is solid and you can pushed out all the liquid with your squeegee.
For large windows, or if you have to align two sections so they line up flawlessly, we do recommend having the perforated window graphics installed by professionals. Depending on the quality of the vinyl, you probably need a warm day of 10°C or higher for the adhesive to bond properly with the window, installing it on the window when the temperature is below the recommended minimum could result in the vinyl graphics failing well before they should. Check with your printer for installation requirements if you'll be putting up the graphic yourself.
Apply Your Perforated Window Graphics
So, when we install any window graphics, we begin by cleaning the windows. Old graphics may need to be removed from the surface. This can take both extra time and money. Removing a few letters or security stickers is different then peeling off larger, solid graphics.

Some graphics need to be installed in 2 pieces, depending on the size of the windows.
Once the window is prepared, cleaned of ALL dust, dirt, and debris, it's time to apply the graphics. With the backer still on, tape the graphic in place so you can double check all edges to ensure that no part of the graphic runs off the glass onto the seal or frame. This is important. If even a small little corner runs off the side, it becomes a weak point and could end up quickly peeling away. You can still trim small slivers away, using a straight edge and a sharp knife.
Once you've confirm the size, and the graphic is taped in place, you can start applying it to the glass. Starting with the top edge, about 1 to 3 inches, peel off and fold down the backer. Using your squeegee, starting in the centre, rub the graphic down, fixing the adhesive to the glass. With the top edge secured tot he glass, you can triple check your edges, making sure you are level and straight to the window.
Now, you can begin peeling the backer off the graphic and carefully adhering the perforated window graphics to the glass. It can be tricky ensuring that you do not have air bubbles and ripples, but with a high quality vinyl and a strong laminate you can usually peel back an inch or two if you need to retry. This is the part that practice and experience really help. Keep your squeegee at about a 45 degree angle. Go slow, start from the horizontal centre, and push out to the sides as you make your way down the graphic.
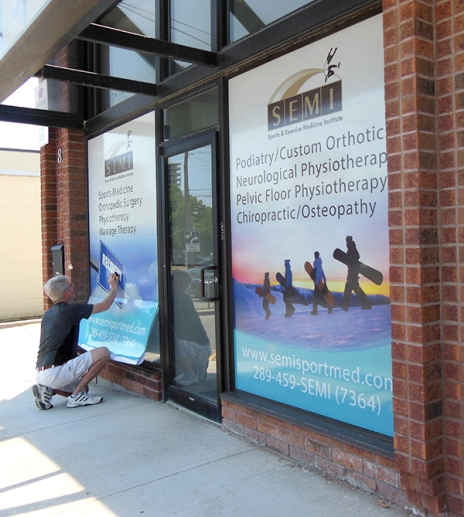
There. That's the first one done. Maybe a hiccup or two? Don't worry, it gets easier as you go. Or did it go on smooth? Well done. If you have more, get to it. You can go around now and clean up any edges. If something went wrong and some of the graphic has made its way up on the window frame, you can carefully trim away the excess with a sharp knife, just be careful not to scratch the glass beneath. Do not leave an edge loose, make sure ALL of the graphic is fixed onto the glass.
Once complete, the optically clear laminate will protect the colour and graphics from the elements, and the adhesive will keep it bonded to the glass. Allow 24-48 hours for it to completely set to the glass. From inside you'll be able to see out, and from the street your clients will see a professional and impactful design representing your business.
As always, feel free to contact us with your questions or concerns.
Related Products


